Design
System Architecture Diagram
Our system consists of three main components. A Front-End Web-App, a Back-End image-processing server and a Databse/Hosting solutioon.

Front End
Our front end component consists of a Web-App created in Reactjs. This component allow the user to perform account registration and login, as well as Manuscript upload, visualization and Character Searches. We chose React for its high component reusability, performance and maintainability. This component will be making POST requests to the Back End Flask Server to perform image processing.
Back End
Our Back-End solution is a Flask server. This hosts our image-processing Python algorithm. The implementation of the algorithm relies on normalised cross correlation to find occurrences of a patch image in a collection of images. We chose Flask as it allows fast development and easy deployment.
Database and Hosting solution
To save user data and store manuscripts we chose to use Google's Firebase Database and Storage. This offered plenty of tools such as built in account password reset, easy user managment and easy visualization and manipulation of the manuscripts uploaded. Regarding the Back-End, it is hosted on a virtual machine on Azure, part of the Microsoft Cloud Infrastructure.
Sequence Diagram
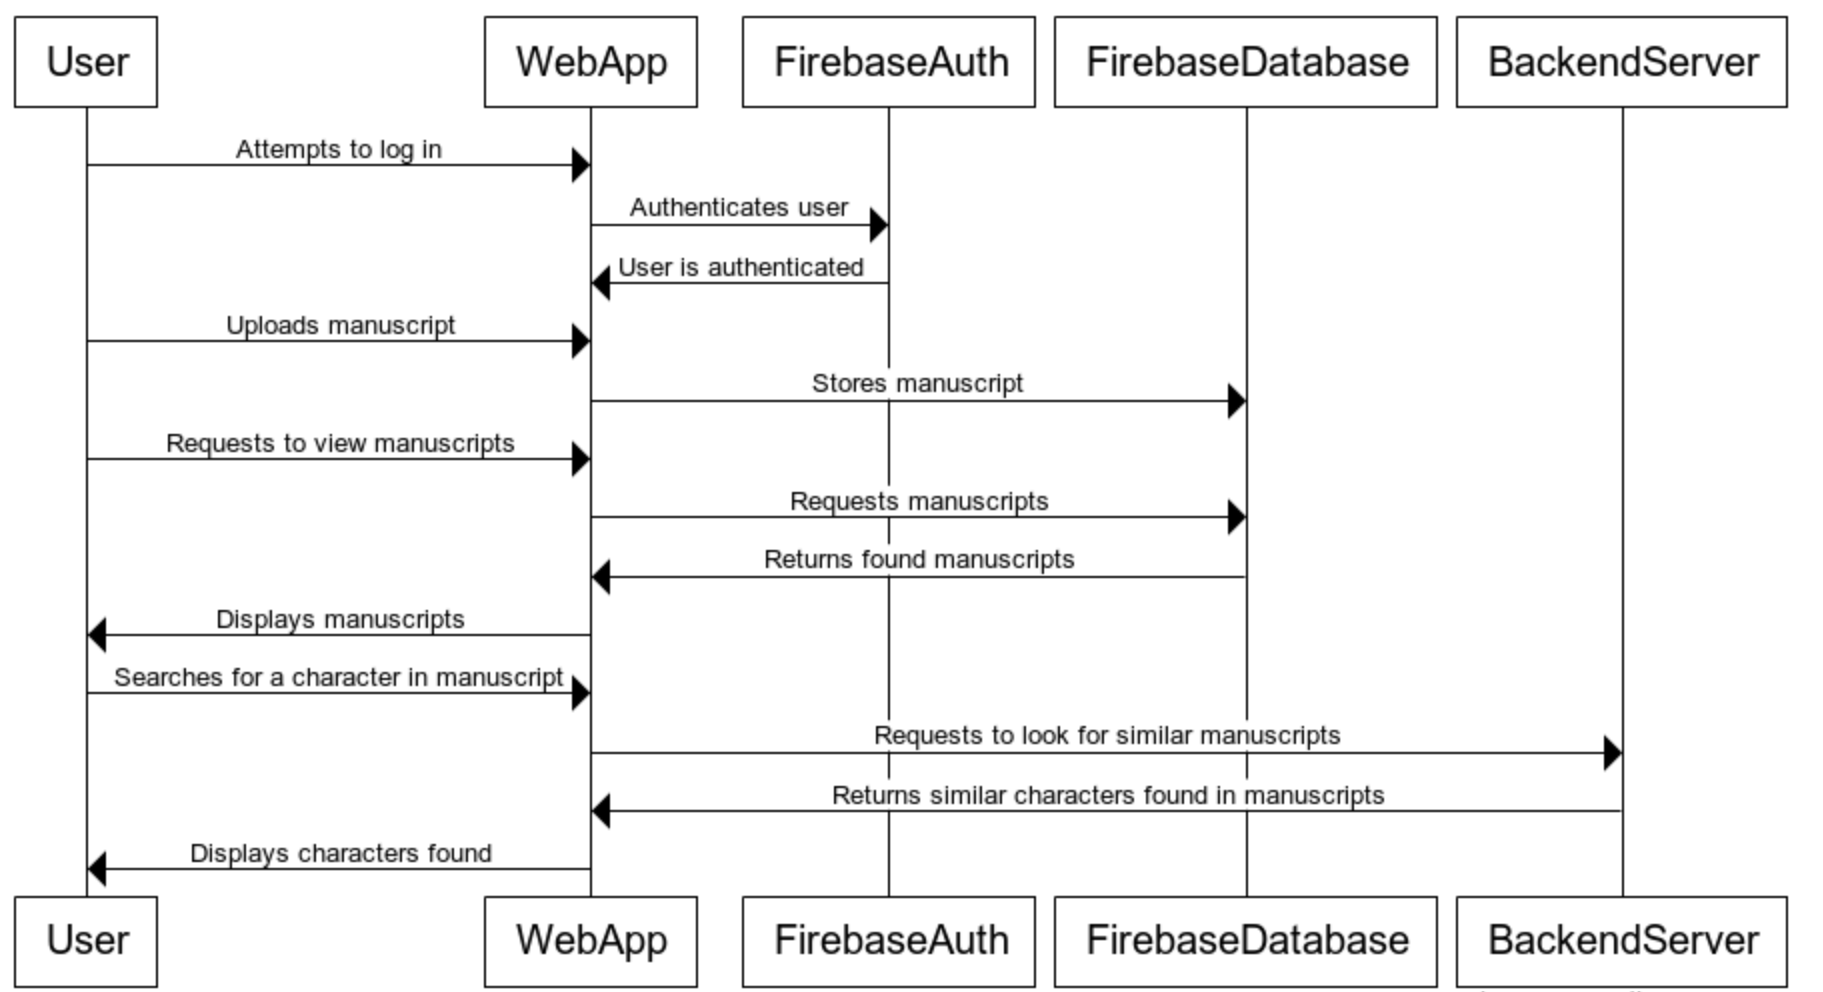
Design Patters
Stateful Components rendering Stateless Functional Components
As per standard React guidelines, the structure of the frontend application is comprised of stateful components, which only are responsible for frontend application logic, and stateless functional components, which use the React props to display data obtained from the stateful components [1]. This contributes to decouple functionalities in the frontend, allowing for overall higher cohesion.
Observer
The observer design pattern is extensively used throughout the application, especially in the application frontend. All of the data change events are managed by attaching listeners to UI components. These listeners fire callbacks which alter the state of the frontend and can also send requests to our backend API. For example, in the character search page, a callback is assigned to the the "Start Search" button which fires every time a user clicks on it [2].
Furthermore, the observer design pattern is also used in the frontend when making requests to the firebase database. This is because requests are managed asynchronously, and the data obtained from the database is passed as a parameter to a callback.
Iterator
The iterator design pattern is used when rendering results obtained back after making a request to our backend server. Specifically, we obtain a list of image URLs which have to be rendered to the user. These are passed as props to a stateless component, and are iterated through via the iterator pattern by using the map function. Each item in the results array is mapped to an appropriate JSX component and rendered to the screen.
Decorator
The decorator is used in the backend API in order to handle POST and GET requests through the Flask micro web framework. This is done via specific decorator methods such as @app.route, which wrap the following function to handle the request made to the API endpoint.
State
Our system is based around React components which have states. This design pattern allows us to alter the components' behavior when their internal state changes. For example, in the login page, when entering invalid credentials, the state is changed after the wrong email and password combination are detected.
Data Storage
Our Data Schema is composed of three main subsections: manuscripts, users and search-image. The "manuscripts" section stores each manuscript that is uploaded from the Web App using the title as the key and as value an array of string links for each page. This allow all the pages to be stored sequentially and retrieved as they are uploaded.
Moving on the "users" section we store each user account with his relative UUID as key and value an object composed of an email and username keys. Their values are both strings that save the user email and their username.
Finally the "search" section has as key a string with the name of the image used a patch and as value a string of the image url.
Here our Data Schema:
{
  "manuscripts" : {
    "Manuscript 1" : ["Link1_1", "Link1_2"],
    "Manuscript 2" : ["Link2_1", "Link2_2"]
  },
  "users" : {
    "UUID-1" : {
      "email" : "example@example.com",
      "username" : "example"
    },
    "UUID-2" : {
      "email" : "email@email.com",
      "username" : "email"
    }
  },
  "search" : {
    "search-image" : "search-image-Link"
  }
}
Implementation of Key functionalities
User Authentication
In order to implement user registration and login, we made use of Firebase Authentication. If the user is not registered in our databse, he can create an account by filling a registration form. A valid email address, a username and a password need to be provided. We first validate the user input and then create a new account by using the FirebaseAuth promise to create a new user.
 auth.doCreateUserWithEmailAndPassword(email, passwordOne)
      .then(authUser => {

        // Create a user in your own accessible Firebase Database too
        db.doCreateUser(authUser.uid, username, email)
          .then(() => {
            this.setState(() => ({ ...INITIAL_STATE }));
            history.push(routes.HOME);
          })
          .catch(error => {
            this.setState(updateByPropertyName('error', error));
          });

      })
      .catch(error => {
        this.setState(updateByPropertyName('error', error));
      });
doCreateUserWithEmailAndPassword is called, sending the userName and Password to the authentication service. The .then is responsible for handling the asynchronous response from FirebaseAuth, returning the newly authenticated user. We then use this information to create a user in our database through another nested promise. Both of these promises are checked for errors with their appropriate .catch functions, and if something goes wrong in the process then we display the error on the screen by changing the state of the React Component.
Manuscripts Upload
To allow users to create a Manuscript Collection, we used Firebase Storage in conjunction with Firebase Database to upload and retrieve. As the Firebase Database was unable to store image data, the images were stored on the Firebase Storage. The URLs to the images were then stored in the Firebase Database in order to allow more complex data structuring, not implemented in the Storage service. This mapping from URLs stored in the Database to the Storage enabled for more complex data operations both on the frontend and on the backend. The upload operation is monitored to alert the user if an upload error has occurred or the operation has been correctly completed. Once the upload has been successful the event handler delegated to add the reference of that manuscript on the Databse is fired.
handleUploadSuccess = (filename) => {
    console.log(filename);
    this.setState({ avatar: filename, progress: 100, isUploading: false });

    firebase.storage().ref('manuscripts/' + this.state.name).child(filename).getDownloadURL().then(
      url => {
        this.setState({ manuscriptURL: url });
        this.updateManuscriptDB(this.state.name, url);
      }
    );
  };
Furthermore, before uploading the manuscript, the title of the manuscript is validated to prevent uploading errors related to illegal use of characters.
Manuscripts Visualization
To display the uploaded Manuscripts, we first retrieve their references from the Database. As previously mentioned, we use these references to obtain the corr****esponding images from the Storage. Once retrieved, the images are displayed as thumbnails.
<Card style={cardStyle} key={this.props.titles[index]} onClick={() => this.openModal(manuscript, this.props.titles[index], index)}>
    <div onClick={() => this.openModal(manuscript, this.props.titles[index], index)}>
        <CardHeader style={headerStyle} onClick={() => this.openModal(manuscript, this.props.titles[index], index)}>
          <h4>{this.props.titles[index]}</h4>
        </CardHeader>
        <CardBody style={imageStyle} />
    </div>
</Card>
If a user clicks on a thumbnail, a modal containing all the manuscript's images is opened.
<Modal id="modal" isOpen={this.state.modalIsOpen}
    onRequestClose={this.closeModal}
    style={customStyles}>
    <form>

        <ManuscriptView manuscript={this.manuscriptToPass} title={this.titleToPass} number={this.numberToPass} />
        <br/><br/>

        <button id="normalButton" onClick={(e) => {
            e.preventDefault();
            this.closeModal();}}>
            Back
        </button>
    </form>
</Modal>
Another visualization method we used in our system is an image slider for the results page.
Normalised Cross-Correlation (Similar Character Recognition)
To allow the user to conduct character searches, we made use of the normalised cross correlation function of the Scipy library.
From the front-end side, we add the reference of the template image to be used for the search to Firebase Database. We then register the x, y, width, height values of the user cropped template image. Lastly, the user specifies the manuscripts where the search will be performed. Additionally, the user can specify some advanced options:
- allow duplicate results to be shown
- increase result's highlighted frame to spot more easily the detected character
- specify the number of results
- specify the number of times the patch is resized to match characters with different resolutions
- specify the resize scale the patch is going to be resized with
This values, together with the patch url, crop dimensions and manuscripts urls will be sent as request to our back-end server.
On the backend server, the images (the patches and the manuscripts) are converted to 3D-Arrays to then analyse for similarty using a cross correlation algorithm. The images are normalized in order to convert them in an equivalent standardized way by subtracting the mean value of each image from the image itself. The cross correlation algorithm is imported from the Python Scikit module and then applied to the patch and images.
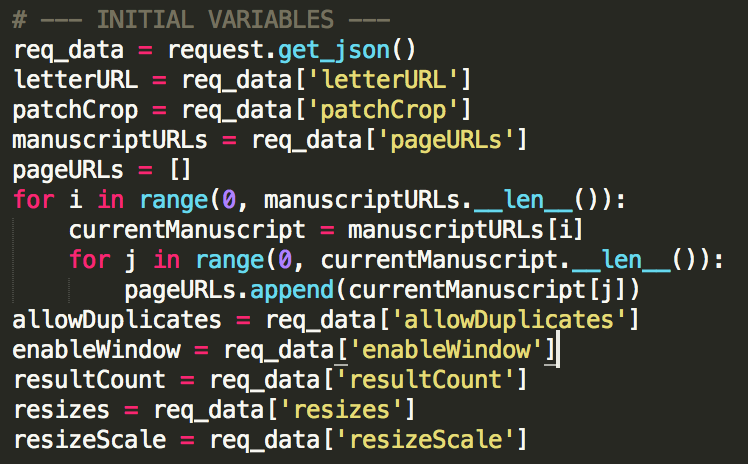
Specifically the backend API executes the following:
First, all the initial variables are set. Since all of these are received from the front-end, the back-end must first make a request to receive them. Upon receiving the request, the script breaks it down into the variables it needs to function. The only changes that need to be made are a conversion of the manuscript URLs to an array that stores page URLs, as this is how the script was originally designed. The conversion is done by cycling through the manuscript array, and simply adding each page of each manuscript one by one to a new array.
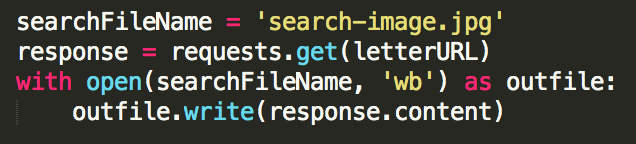
Following the intialization of the necessary input variables, the script goes on to download the image used to create the search image. The back-end makes a request to the URL where the search image is stored, and downloads the image that it finds, saving it under the file name 'search-image.jpg'.
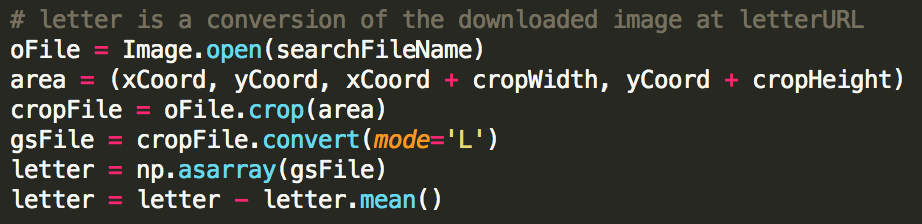
With the search image downloaded, the script then opens the saved image, for use in the script. Once the search image is opened, the script selects the area that the user selected with the front-end crop tool, and stores this as the image to use for the cross correlation. With the search image refined, the image is converted to grayscale to remove any interferences due to light, and coverts it to a numpy array to prepare for use in the algorithm. Finally, the mean of values for the pixels in the image are subtracted from the image, to normalise it. The same is performed for each page that is submitted to the backend, though this is not shown in the code snippet.
Sequentially, cross correlation performed on the data. This is done via a SciPy function that creates an array of cross correlation values at each pixel in the search field. The array of results is then sorted, allowing us to access the most similar characters in other manuscripts.

This loop allows for the script to take the top results from the cross correlation array, and convert them back into x, y coordinate pairs. Upon retrieving these coordinates, the coordinates are then converted into percentages (as this is how the front-end crop tool will go on to display them), and stored in an array, ready to be sent back to the front-end. The cross-correlation result is also stored in an array to be sent to the front-end.

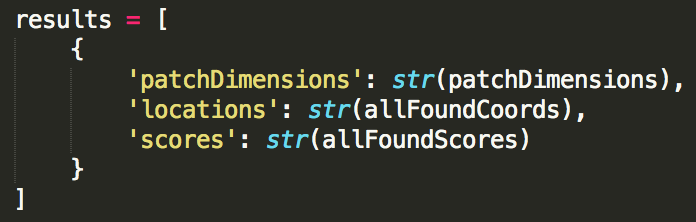
The necessary arrays are converted into strings and stored as JSON, allowing them to be sent to the front-end where they can be used to create a display of the results.
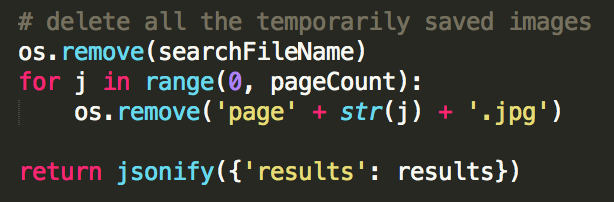
All of the temporarily saved images created by the script are deleted, and the results are converted into JSON. The results are then returned and displayed in the front-end.
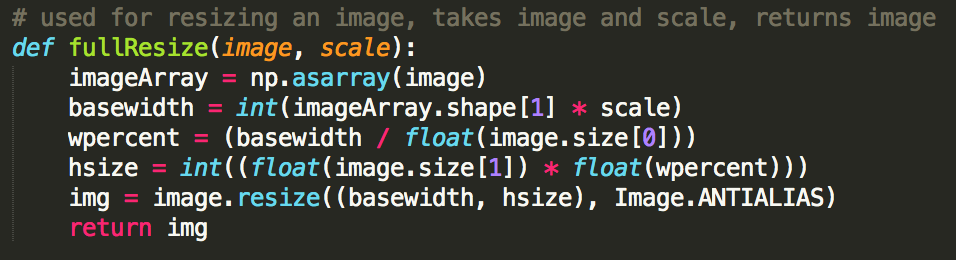
Finally we built our own resizing function. Its sole purpose is to take an image and a scale, and return the input image resized to the desired scale. The function works by creating a numpy array for the input image. It then takes information about the size of the numpy array to get the size of the inital image in pixels. By multiplying the original width by the scale, and then calculating the corresponding new height using ratios, the function then resizes the input image to these calculated values - using anti-aliasing to smooth out the resulting image.
References
[1] - Vora, P.M.N., 2009. Web application design patterns, Burlington, Mass.: Morgan Kaufmann. [2] - Wu Ren & Wenyun Zhao, 2012. An observer design-pattern detection technique. Computer Science and Automation Engineering (CSAE), 2012 IEEE International Conference on, 3, pp.544–547.